Labels

Showing posts with label Create with me. Show all posts

Thursday, March 17, 2011

Catch a leprechaun today!


Need some gold?  Tired of looking at the end of every rainbow only to find yourself disappointed that those pesky leprechauns fooled you again?!  Why not build a leprechaun trap?  It's a great way to fuel your child's imagination, as well as their fine motor, visual spatial and symbolic play skills.  

I received some inspiration yesterday from one of my favorite preschools that had their students come up with ideas from materials ready for recycling.  Children chose from cardboard boxes, glass jars, shredded paper, wrapping paper scraps and strawberry containers.  They were then told that leprechauns love shiny, sparkly things, so children eagerly decorated their traps with vigor.

Try to have your child visualize what a trap may look like.   What will lure the leprechaun inside?  Where will the leprechaun enter?  How will it get trapped?

Here is a simple trap made from a plastic container with a lid and a paper towel tube.  Nothing too fancy (it was done by a 3 year old).  I guess leprechauns love potatoes, so one was put inside so the little bearded creature could smell it via the "tunnel".  


An abstract idea that can be carried out for a day or two is excellent to keep children connected to a single idea and to work on delayed gratification.  Be sure to let your child know that leprechauns are very tricky and mischievous.  I say something along the lines of, "I have tried for years to catch one, and I never have.  We can try... but those leprechauns always find a way out."

I'm sure your child will come up with a ton of questions for you to creatively answer.

The leprechauns in my house come at night when everyone is sleeping.  They like to play with toys and then leave a mess to let you know how mischievous they can be.  Leprechauns also leave behind gold glitter wherever they walk.

Get as creative as you like... your kids will eat it up.

Here is a kid-friendly link for more leprechaun trap ideas.  I also like this link that provides ideas for geeky traps, if you really want to go all out. 

Saturday, February 19, 2011

Fun with food

Kids aren't the best eaters, which I am sure is no surprise.  Beyond bribing with treats, not much works to get little ones to eat the healthy stuff on their plate.  Sometimes even bribes don't work!

If you're at a loss at mealtime or are just looking for ways to make meals more fun, try making some food art.  Now, you don't need to be a food stylist to make this happen.  I just go with smiley faces most of the time.


Your kids may also enjoy making their own creations. 

This strategy is particularly helpful for children that are very picky eaters or have feeding challenges.  I once sat in awe and watched a speech pathologist work on getting children to explore different food textures by putting marshmallow fluff on the end of a pretzel rod and asking kids to go "fishing" by putting the sticky pretzel on some goldfish crackers.  Sounds disgusting, but those "picky" eaters ate up those fluff covered goldfish like it was manna from heaven.

Let your imaginations run wild!  I'd love to see some pictures, if you get creative.

If you need some further inspiration, amazon.com has some good selections for "food art."  Here is one:
Cool Fruit & Veggie Food Art: Easy Recipes That Make Food Fun to Eat! (Cool Food Art)

Thursday, February 10, 2011

Want your kid to have the most unique valentines?

I've never been a fan of the boxed valentine with all the licensed characters.  I know that little kids love them, but when giving a little piece of your heart I think that something handmade is way cooler than Optimus Prime or Dora on a perferated sheet of flimsy card stock.
I had a feeling that my little guy would put up a big fight not getting to pick out valentines with his favorite character ("Won't you be mine?  Love, Iron Man." Now, that just doesn't sound right).  So, I searched and searched for a project that is boy-friendly and also Valentine's Day appropriate.  The Artful Parent helped me out once again.  What little boy doesn't love the idea of giving rocks to his friends??

This project really doesn't take much.  I went to Hobby Lobby (cheapest craft store ever, btw.  Too bad it's so far away from me) and took a gander at their fabrics.  Now, I do not sew and have never really shopped for fabric.  However, I quickly found some good Valentine's options and bought 1 foot of two patterns. 

I also bought a bag of river rocks here which are found in the silk flower section. 

To start, cut out some appropriate sized hearts out of the fabric.  If your child is old enough to use sharp scissors, by all means pass along the job to him/her!  To affix the hearts to the rocks, paint some mod podge over the top and let dry.  My little guy particularly like this part.

We completed this project at my in-laws house which reminded me how lovely it is share these activities with family.  When was the last time your child's grandma or grandpa sat down at the table to do an art activity?  If you bring up the idea, I'm sure you will have some takers.  We even had a little get together that night and my little man loved passing out his heart rocks.


Saturday, February 5, 2011

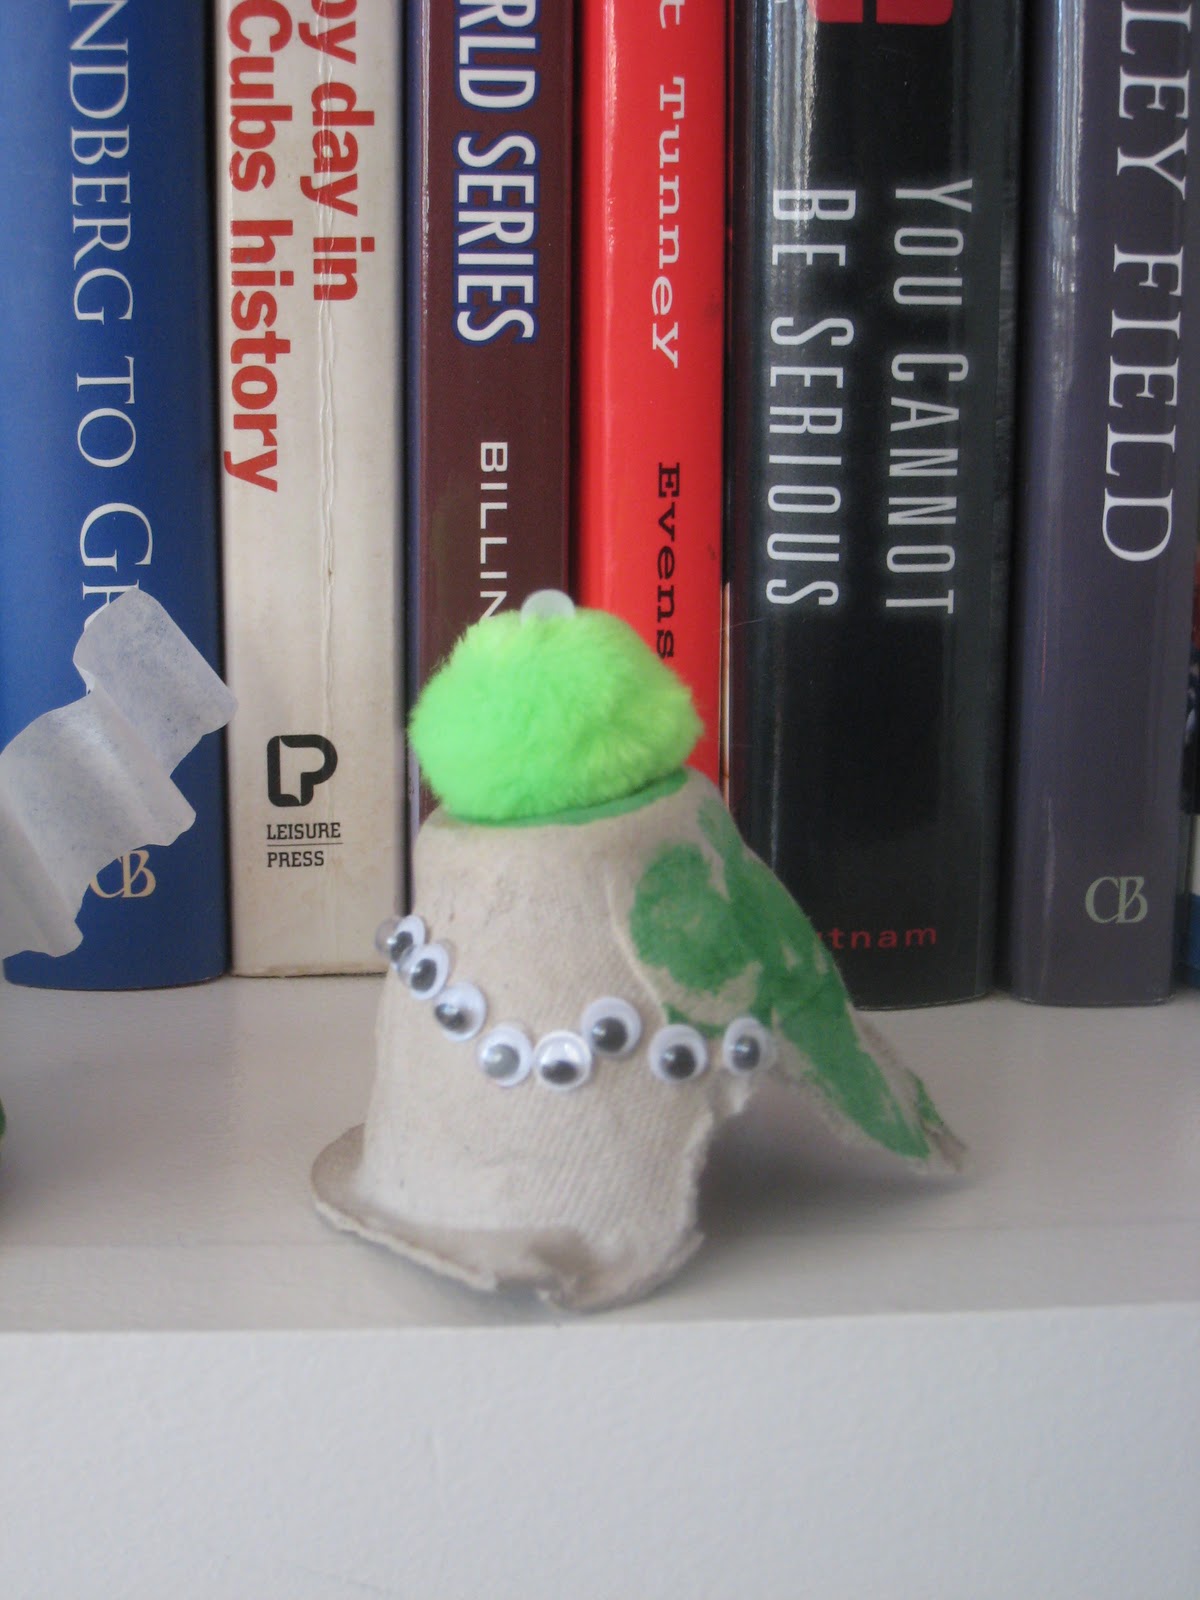
Get all goofy with Egg Carton Aliens


I always love when I can combine an art activity and a play activity - or, in other words, make something to play with.

These Egg Carton Aliens are super easy and will allow your child to really use some creativity to make toys that they will, hopefully, play with for a while.

All you need is an egg carton (use some scissors to cut out the individual cups), tempera paint, and some alien creation goodies (googly eyes, fuzzy craft balls, etc.). 

Start by letting your little one paint the egg carton cups.

Once dry, you are ready to decorate.  For kids that have some difficulty with the creative process (i.e. get frustrated when they have to come up with idea on their own), you may want to make a model for them first and then ask them to make the same alien as you.  Or, you could try taking turns, "I put on an eye.  You put on an eye." 


And then, well, voila!  You have some out of this world aliens. 


I'm sort of partial to these birds that were declared, "Alien pets."  We made the wings with the scraps from our Valentine Garland activity.


A certain little guy I know worked on this alien for 25 minutes.  Talk about alien intensity!


Now, your child will be chomping at the bit for these puppies - uh, aliens - to dry so that they can be played with.  Now, all we need is ship.  Shoe box anyone?

Hang up some love

More coffee filter action!  Your little one will adore decorating for Valentine's Day with this easy heart garland.  This is also a nice way to include children of all ages and abilities in one art project.  I find that when kids create together, they are even more proud of the finished product.

Start by getting some arty materials to decorate a coffee filter.  Once again, I love these dot markers.

But don't get shy to use glitter glue, markers, stamps, whatever tickles your fancy! 
Once you have a good number of filters decorated, cut out some hearts.  Just fold the filter into quarters and cut out the heart shape.  Be sure to leave some of the fold intact.  You will want to fold the heart over the string.
Next, lay out your string and hang your hearts.  You can glue the inside of the hearts to the string or for the lazy in the room (me!) just use some scotch tape.  I also dabbed a bit of glue stick on the inside so the back and front of the hearts stuck together.

And here's the finished product.  Pretty darn cute, if you ask me!


Wednesday, February 2, 2011

Valentines that will melt your.... crayon?

I found this idea on the Artful Parent blog - one of my faves.  This is a totally simple craft that kids of all ages will love. 

Start by letting your child choose 3 or 4 crayon colors.  Grate them with a cheese grater and keep the colors separate.  I used different graters to make the color shavings different sizes. 


Using some durable paper (I used water color paper), let your child sprinkle the shavings onto the paper.  This is a great time to help your child label the colors and discuss what colors are darker/lighter, what shavings are bigger/smaller, etc.

Once your little one is finished sprinkling, lay some wax paper on top.  Using an iron on the lowest setting, lightly iron over the crayon shavings allowing them to melt.  Your child will love watching this part!

Finally, encourage your child to use a heart stencil to make valentines.


Cut out and pass out to friends and family.  Xoxo...

Inexpensive craft kits are a no-brainer...literally!

I love craft kits for days when I 'm not feeling especially creative. They are also great for when your little one wants to be crafty, but the idea of set-up and clean-up is just a bit too much that day. The Alex brand has some really lovely options that your kids will eat up. 

Big time cute factor.


I like this one because there is no glue needed.  Just peel off one section at a time to reveal a sticky surface, crumple the tissue and stick!

This mosaic set is incredibly easy for preschool age children and up.  Just peel the shapes and stick them on!


Here is a little guy I know making a T-Rex mosaic from this set.


Any other craft kits out there you'd like to share?


SNOW DAY!


We are officially snowed in here in Chicago with over 18" of snow.  Living in the city means that our streets won't get plowed for a few days and once you dig out your parking space, you don't want to leave for fear that you will lose it. 

So... we're here.  Inside.  For at least a day.  Or two. 


Which is great news for you (and me, too, I guess) because I can get caught up on the all the blog posts that have been marinating in my head waiting to get out to the blogosphere. 

On a snowy day, I can't think of a better activity than making coffee filter snowflakes.  You really don't need much:  Coffee filters, markers, water colors, safety scissors and whatever other decorating materials you can conjur up.  Personally, I love using dot markers for this activity.  They are fantastic tools for children of all fine motor abilities. 


Watercolors are great, too.

When it's time to cut shapes into the filter, just fold into quarters and cut cutting.  Younger artists may need you to draw shapes onto the filter to help them know where to cut.


Your child will love opening up his/her snowflake to see the design.

Be sure to hang them on a window for the full effect!


Saturday, December 18, 2010

Help your child get in the spirit of giving with salt dough ornaments

Asking your children to make something special for loved ones on the holidays is something I consider necessary.  With so many gifts coming their way, it's always nice for them to reciprocate.  Plus, I think little ones get a big kick out of the "ooo-ing" and "ahh-ing" that inevitably comes tumbling out of the mouths of relatives. 

These salt dough ornaments are something that your child will love to make and to give.  The dough is also great for just using like play-doh, too, if you aren't in the mood to go all the way with this activity.  This recipe comes from PaintCutPaste, one of my favorite go-to blogs for crafty ideas.

Salt Dough
4 cups flout
1 cup iodized salt
1.75 cups warm water
Mix and knead for 10 minutes


Roll out your dough on a floured surface. 


 Use cookie cutters to make shapes.
Use a straw to poke holes for your string.
Bake at 300 degrees for 1 hour.


Let them cool on a wire rack for 12-24 hours.
When ready, use a water-based paint like tempera or acrylic to decorate.
I like to use glitter and stickers to make them look even fancier.


There is just something so special about a child's artistic touch, isn't there? 


Thursday, November 25, 2010

Say "thank you" with a mobile

No Monsters in My Bed posted a list of her favorite mom/dad blogs today.  I love checking out new blogs and came across a dad named Joel who has some amazing craft ideas to enjoy with your kids.  Made by Joel highlights a Mobile of Thanks to help you and your children celebrate Thanksgiving today. 


If you don't have to host any guests today or are really ahead of schedule with your cooking, a mobile is a pretty simple thing to whip up.  It would also look fab hanging about a Thanksgiving table.   I even think the best part might just be the hunt for the stick, frankly.  You don't have to get incredibly fancy - just use some construction paper, markers, glue sticks and even photos of people or things you are thankful for.  Thread is great for hanging your creations.  Your child may not be old enough to completely grasp the concept of being thankful, so just ask him to name his favorite things, people and his favorite things to do with Grandma, Grandpa, etc.  Then, simply write those things out or draw pictures of them, punch a hole, tie some string and hung it from the branch.

I'd post a picture of mine, but hanging mobiles are tricky things to take good pictures of and, if you haven't noticed, photography lessons would be something I'd be really thankful for.

Enjoy your children and one another today.  Get down on the floor and play today, too - it's one of the best ways to show your children how thankful you are for them.

Tuesday, November 23, 2010

Petite Picassos, Mini Monets, Wee Warhols

I don't know about you, but there is no way I can trust my three year old in an art museum.  I can just picture the look on the gallery guard's face as my little one runs full force, palms out ready to touch a Seurat, Degas or O'Keefe.

But, I love art and am eager to introduce it to my son without the use of creepy Baby Einstein DVDs.  So, I use my art coffee table books, scanner and a little patience to help him recreate the masterpieces of the great artists of our time.

Begin by letting your child pick out the painting they want to reproduce.  You can flip through an art book or go on a website.  Whatever the source, make sure you can print out the picture.  My son chose "Charing Cross Bridge" by Andre Derain.
I made a color copy, cut it out and taped it in the top corner of his easel.  I then challenged him to paint the same picture.  Your child may need some help of where to begin.  Start with the most concrete item in the painting.  For example, in the above painting, a good place to start would be with the bridge.  Then, help your child identify what colors they need, where on the paper they go, what kind of brush stroke to use, etc.
Some great vocabulary to use would be directional "top" "bottom" "edge" "corner" or descriptive "dark" "light" "soft" "mixed together". 

Your child may need a lot of structure and help with this or very little.  My guy needed a lot of assistance and patience from me.  If copying a painting like this is too hard for your little one, have your child copy something that you have painted.  You can even do it side by side.  Mom draws a circle - Son draws a circle  Mom makes a nose - Son makes a nose, etc.

Here is my son's finished Derain.  I'm pretty sure that without the original beside it, no one could decipher that this is a picture of a bridge, but that's not the point is it?  It's all about the process and our enjoyment together - not the product.

Tuesday, November 9, 2010

Don't be afraid of the mess

As parents, many of us tend to shy away from messy play.  I know I've had many moments of dread with my son when he's asked to get out the play-doh and moon sand or the worst of the worst... when I've heard the question, "Mommy, can we paint a picture?"

But, frankly, we just need to take a deep breath, get out some newspaper and dive in!

Messy play, or what many therapists and teachers out there call "sensory play" is an extremely important thing to explore when it comes to development.  It allows for another modality for your children to discover and find ways to express themselves.  It also isn't uncommon for children to be hesitant with messy play because they don't like to get dirty or the texture of the substance may turn them off.  It is for these children that messy play is most important.  You'll just handle their anxiety and/or aversion with sensitivity - introducing materials slowly, letting them start by just touching it with a spoon or even giving them some rubber gloves to wear while exploring.

So, today's activity is.... making "Goop."  I know.  It sounds disgusting, but don't be scared.  I have found and tried out a ton of recipes, and this is the easiest to clean-up.  All you need is some cornstarch and water.   You can add some food coloring, if you like.


Begin by putting a good amount of cornstarch in a bowl.  Let your child touch the cornstarch on its own - talk about what it feels like and predict how adding water will change how it feels.  Then, slowly add some water little by little.  At the right consistency, the "goop" will be drippy, but not watery.  Your child will be able to pick up a little ball of "goop" and watch it melt before her eyes.   If you don't mind the dye-factor, include your child's choice of color.


Encourage your child to become symbolic with the "goop."  In this play, Buzz Lightyear jumped in the pea soup.

Now, I know this looks like it will be a pain to clean up.  It really isn't.  When the mixture dries, it turns to powder that is easily wiped off clothing and swept up.  To get the toys and materials clean, just rinse and wash.  I would suggest not wearing black, only because, like all white powder on black, it doesn't entirely wipe off without a trace - you'll need to wash it out.

Enjoy your "goop!"